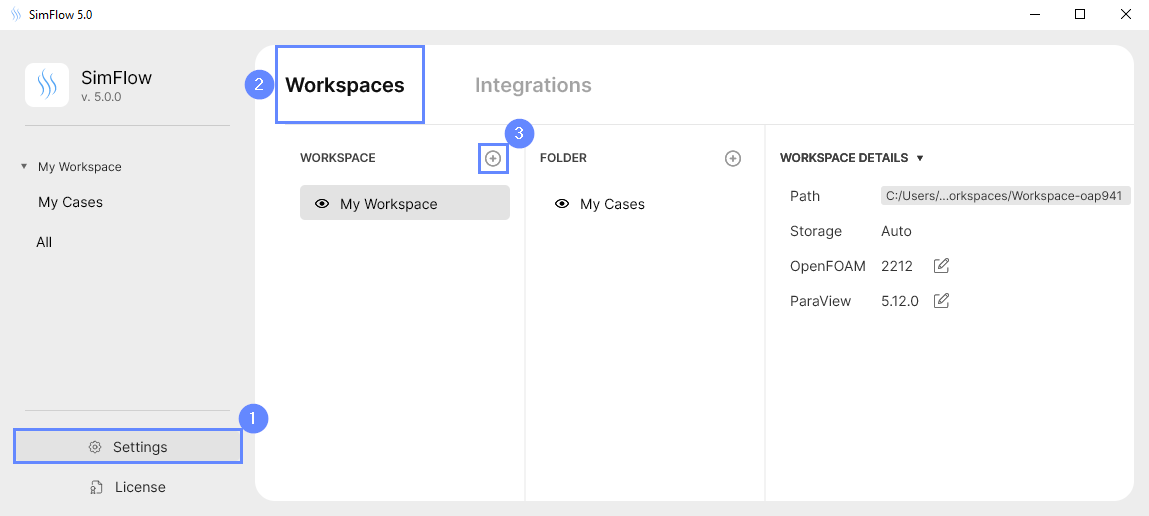
Workspace
What is Workspace?
Workspace serves as a dedicated area on your hard drive for storing your SimFlow cases, providing a centralized location for organizing and accessing your simulations, mesh files, and results.
Within each workspace, you can create any number of folders to organize the SimFlow cases. All simulations within a workspace are associated with selected integrations (OpenFOAM, ParaView).
Adding Workspace
- Automated Workspace
A new workspace will be created inside a default location. - Manual Workspace
You can specify the location of a new workspace.
Legacy Workspaces
If you were using a previous version of SimFlow (e.g., SimFlow 4.0), existing workspaces will be imported automatically into SimFlow 5.0.
Automated Workspace
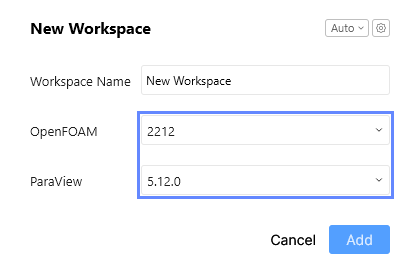
To create a new workspace, simply enter the workspace name. If you have integrated multiple versions of OpenFOAM or ParaView, you will need to choose a version assigned to the workspace (see Integrations).
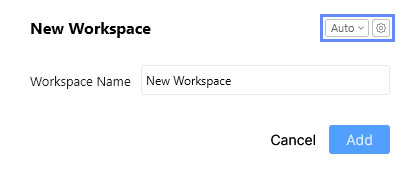
All new workspaces will be stored in the default location. You can change the default storage by clicking on the settings icon ![]() located in the top right corner.
located in the top right corner.
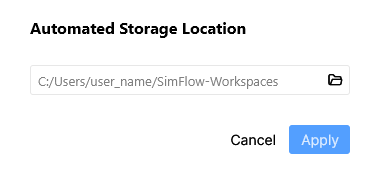
Path Restrictions
Storage Location cannot be located in a certain directories. The path should meet the following criteria:
- located inside an existing workspace
- cannot include an already existing workspace
- cannot be a restricted path (system root, desktop, user home)
Manual Workspace
The Manual Workspace option gives you control over the location of a particular workspace. If you have integrated multiple versions of OpenFOAM or ParaView, you will need to choose a version assigned to the workspace (see Integrations).
- the workspace name
- the folder path that serves as the workspace
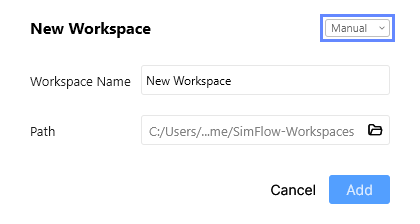
Path Restrictions
Workspace cannot be located in a certain directories. The path should meet the following criteria:
- located inside an existing workspace
- cannot include an already existing workspace
- cannot be a restricted path (system root, desktop, user home)
Workspace Operations
- Manage
Open the settings of Workspaces, accessible from the list on the left side. This allows you to view and manage the contents of the selected workspace. - Rename
Change the name of your workspace. Simply type a new name to update it. - Hide
Temporarily hide the workspace from the list. This can help keep your workspace list organized by removing workspaces you don’t currently need to access. - Show All Folders
Display all hidden folders within the selected workspace. This is useful for ensuring you can see all content within the workspace, even those that were previously hidden. - Add Folder
Create a new folder within your workspace. This helps in organizing your files and projects more efficiently. - Delete
Permanently remove the workspace directory from your hard drive and launcher. This option is available only for workspaces created within SimFlow. Use this with caution as it will delete all contents of the workspace directory. - Forget
Remove the workspace from the list in the SimFlow launcher. This action does not delete the workspace directory from your PC, it simply removes the entry from the SimFlow application. Secures the data from permanent removal.
Similar operations are available for folders.
Case Operation
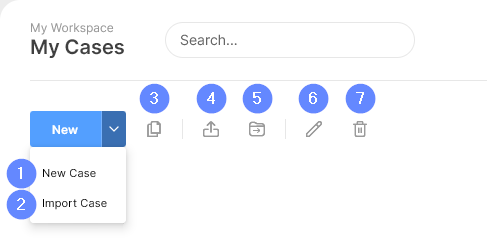
- New Case
Create a new case. This allows you to start a new simulation within SimFlow. - Import Case
Import an existing case into SimFlow. This is useful for incorporating work done in other PC for sharing cases between different users. - Duplicate Case
Create a copy of an existing case. This can be helpful for making changes to a case without altering the original, allowing for creating variations. allowing for creating variations. - Export Case
Export a case from SimFlow. This operation is essential for sharing your work with others or for backing up your cases. It will archive the necessary files to restore the case on other devices. The Zip archive will be created in the case folder. - Move Case to Folder
Move a case into a different folder within your workspace. This helps in organizing your cases, making it easier to find and manage related projects. - Rename Case
Change the name of a case. This allows you to update the case name to better reflect its contents or to follow a naming convention. - Delete Case
Permanently remove a case from SimFlow and your hard drive. Use this operation to clean up your workspace and disk by deleting cases that are no longer needed.
Data Storage Structure
The fundamental unit of file organization is the workspace. Within each workspace, you have the flexibility to define any number of folders to organize your simulations. Within each folder, a simulation directory is created, storing the database files.
A typical path to simulation files follows this structure:
Workspace Dir / Folder / Case Name / Case Name / Database File
Note | To manually load results into ParaView or other post-processing software, you need to specify the file case_name.foam located in the case directory. |
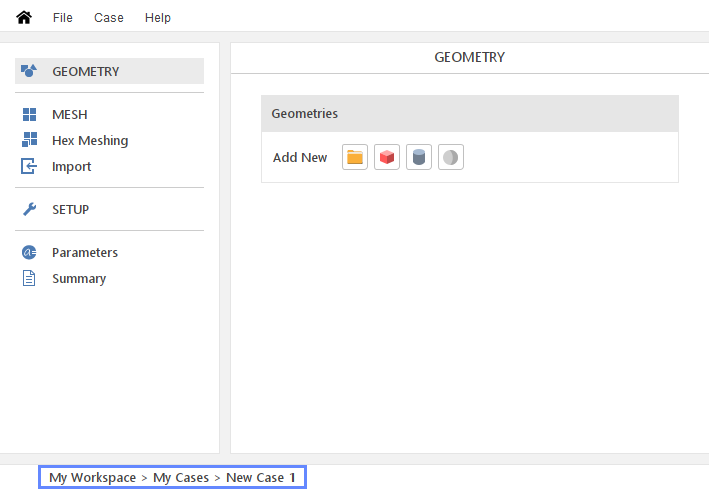
For easy access to the case folder containing the simulation files, you can click the link in the lower-left corner of the SimFlow window. This action will open the appropriate folder in a new file explorer window.
Integrations
The SimFlow workspace is associated with third-party applications such as OpenFOAM and ParaView, referred to as Integrations. When creating a new workspace, you will select the version to be associated with it. If only one version of a particular Integration is available, it will be assigned automatically. Otherwise, you will need to choose a version from the drop-down list.
How to change the assigned integrations in already existing workspace, you can learn here:
Workspace Assignment